

The AC is just not jambin’ cool and crisp like it did during last year’s heat wave, So…. I cleaned the Evap Coil on my LBZ and took a few pics to share.
You’ll need a ¼” bit,
A nylon push-in fastener ($0.70/2pk-Home Depot)
And I’m using an Einszett product shown here,
Professional Air Conditioner Cleaner - Car Odor Remover | einszett
Start by making sure the vent selection is up top, excluding the floor vents and defrost. With the AC off, turn the fan on high and adjust the temp up to bring on the heat. Blowing thru the top vents, at some point it’ll switch to floor only, just override and select floor/top vents combined.
We want to (1) thoroughly dry the evap coil with the fan (AC off) and (2) heat up the ducts to open the pores in the plastic…5-10 minutes depending on whether you’ve been running the AC prior, 1st thing in the morning would be better.
Once you’ve heated things up, reduce the temp back down (no heat) and turn off the motor. Turn the key to ‘On’ and leave the fan running on high.
Open the glove box and mashing in on the side panel, release the stop/catch so it opens all the way to full hinge. Prop it up so it doesn’t just hang.
![Image]()
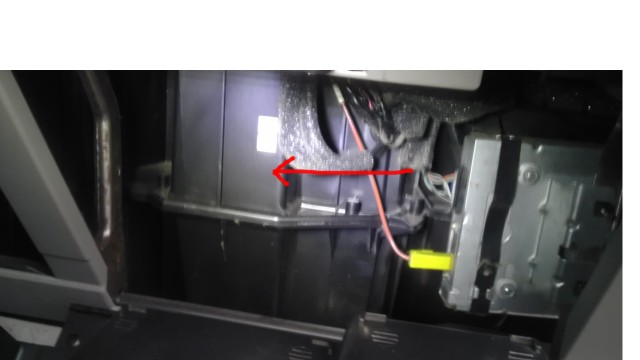
Here is a look at the assembly, pictured from the firewall side, you'll see the (#22) Evap coil's location, just in front of the blower motor, where it sits in item #17. Down low there, you'll see the drain that protrudes into the engine bay.
![Image]()
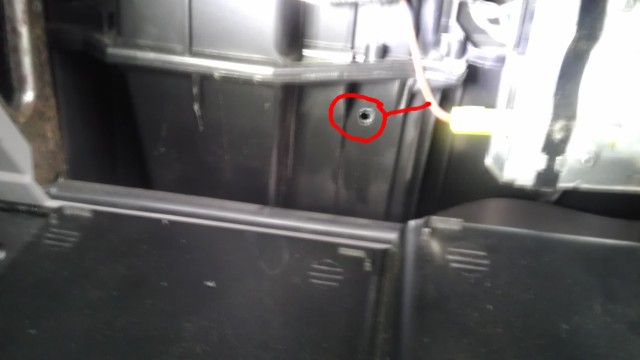
With the glove box door opened up, behind it you can see the protrusion here where the Coil sets.
![Image]()
With the fan still on high, drill here, being careful to not let the bit protrude thru. Stop at the end and finish with the bit in reverse to clean the opening. The fan will blow out any loose debris from the hole.
![Image]()
Turn off the fan, turn off the ignition. Extinguish all flames, sparks, cigs, etc. This stuff is flammable.
At the end of the applicator tubing is a small metal atomizer (see tiny holes).
![Image]()
Give a spray and notice the pattern area.
Note the curve in the tubing and insert into the new hole drilled.
Feel the vibration in the tubing as the metal tip drags across the coil’s fins? Using your sense of feel, insert the tubing farther and shorter in the opening, working your way across the coil, twisting the tubing to go up and down to orient yourself as to where the coil’s full surface areas are inside the cavity.
Once you feel oriented with a mental image of the hidden coil, shake the can fully and start spraying at the top from side to side as you make your way down to the bottom. Every 5-10 seconds, shake the can to keep a steady discharge.
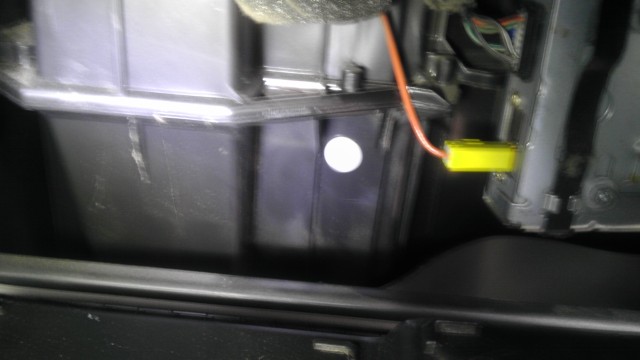
Once you’ve foamed it good, Pull out the tubing and insert the nylon push-in fastener and note the time.
![Image]()
Bring up the glove box door, mash in the side to clear the catch, and close/latch.
I waited 15 minutes to clean, Einszett says no more than 30 minutes. After the wait, start the engine, roll down all the windows and set the AC on “Recir’ with the fan set to ‘high’ and the top vents ONLY selected (no floor/defrost).
This is a ‘self-rinse’ product, using the condensation to rinse the fins. Run long enough for the condensation drain to flow freely. Once it starts flowing, roll up the windows and enjoy the new volume of clean, cold air flowing.
Now, Take ‘er out for a drive to get some air across the coil up front and test the new ‘chill’ factor. :thumb
Edit: Consider adding Cabin Filters too.....
http://www.duramaxforum.com/forum/how-tos-diy-write-ups/480890-how-add-cabin-air-filters.html
You’ll need a ¼” bit,
A nylon push-in fastener ($0.70/2pk-Home Depot)
And I’m using an Einszett product shown here,
Professional Air Conditioner Cleaner - Car Odor Remover | einszett
Start by making sure the vent selection is up top, excluding the floor vents and defrost. With the AC off, turn the fan on high and adjust the temp up to bring on the heat. Blowing thru the top vents, at some point it’ll switch to floor only, just override and select floor/top vents combined.
We want to (1) thoroughly dry the evap coil with the fan (AC off) and (2) heat up the ducts to open the pores in the plastic…5-10 minutes depending on whether you’ve been running the AC prior, 1st thing in the morning would be better.
Once you’ve heated things up, reduce the temp back down (no heat) and turn off the motor. Turn the key to ‘On’ and leave the fan running on high.
Open the glove box and mashing in on the side panel, release the stop/catch so it opens all the way to full hinge. Prop it up so it doesn’t just hang.

Here is a look at the assembly, pictured from the firewall side, you'll see the (#22) Evap coil's location, just in front of the blower motor, where it sits in item #17. Down low there, you'll see the drain that protrudes into the engine bay.

With the glove box door opened up, behind it you can see the protrusion here where the Coil sets.
With the fan still on high, drill here, being careful to not let the bit protrude thru. Stop at the end and finish with the bit in reverse to clean the opening. The fan will blow out any loose debris from the hole.
Turn off the fan, turn off the ignition. Extinguish all flames, sparks, cigs, etc. This stuff is flammable.
At the end of the applicator tubing is a small metal atomizer (see tiny holes).

Give a spray and notice the pattern area.
Note the curve in the tubing and insert into the new hole drilled.
Feel the vibration in the tubing as the metal tip drags across the coil’s fins? Using your sense of feel, insert the tubing farther and shorter in the opening, working your way across the coil, twisting the tubing to go up and down to orient yourself as to where the coil’s full surface areas are inside the cavity.
Once you feel oriented with a mental image of the hidden coil, shake the can fully and start spraying at the top from side to side as you make your way down to the bottom. Every 5-10 seconds, shake the can to keep a steady discharge.
Once you’ve foamed it good, Pull out the tubing and insert the nylon push-in fastener and note the time.
Bring up the glove box door, mash in the side to clear the catch, and close/latch.
I waited 15 minutes to clean, Einszett says no more than 30 minutes. After the wait, start the engine, roll down all the windows and set the AC on “Recir’ with the fan set to ‘high’ and the top vents ONLY selected (no floor/defrost).
This is a ‘self-rinse’ product, using the condensation to rinse the fins. Run long enough for the condensation drain to flow freely. Once it starts flowing, roll up the windows and enjoy the new volume of clean, cold air flowing.
Now, Take ‘er out for a drive to get some air across the coil up front and test the new ‘chill’ factor. :thumb
Edit: Consider adding Cabin Filters too.....
http://www.duramaxforum.com/forum/how-tos-diy-write-ups/480890-how-add-cabin-air-filters.html


