

If you’ve never removed your front grill, it’s quick/easy. Remove the top core cover, remove your headlights, and with a flat blade screwdriver, depress the spring clips to remove. Once you’ve done it before, it takes less than 5 minutes to remove.
There are a variety of paths to choose from in adding a Power Steering Fluid Cooler.
One choice (thx Eric!) is to obtain and add the GM part # 10385584 ($130) for the 6.6L.
Or you can choose GM part #15295847 ($80) for the 8.1L and adapt it to fit.
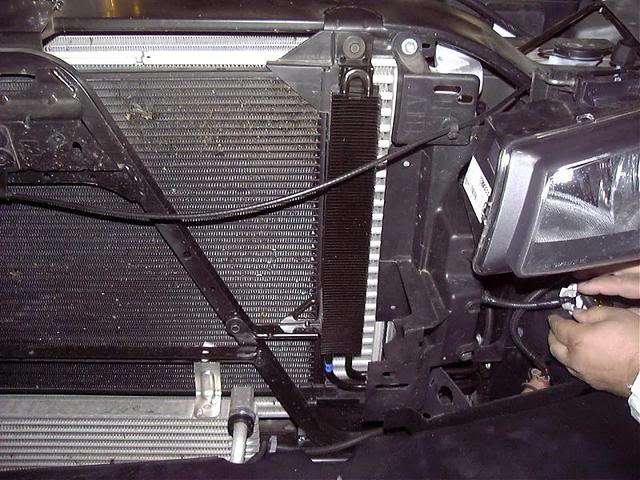
Both mount here, utilizing the condenser coil’s top mounting bolt with an added bolt (#11589039, $1.50) to an existing hole in the trans cooler bracket.
![Image]()
Edit: I see that Dorman offers a kit now that looks similar to the stock GM kit, and how it mounts up front....$48 More Information for DORMAN 918301
In pursuit of lowering the price further, look around fleaBay and Amaz and there are numerous kits available in various sizes that could fit in the same area as the GM shown above.
This one is a bit smaller;
Derale 13200 Power Steering Cooler Kit
Not wanting to play the ship and wait game, pursue available inventory on a local basis.
These are cheap enough that you could bridge two together to equal the GM size for $40.
Hayden Power Steering Oil Cooler
I ended up with THIS cooler from VatoZone.
It was larger than the others and only $30.
It comes with a 4’ section of hose and 4 hose clamps. Add another 3’ piece of hose and 3-4 hose clamps to the mix, along with a double hose barb for the hose splice.
You’ll need 5 clamps total, unless you reuse the lame OEM spring clamp, and you might strip one out over-tightening. Better to have an extra than make a return trip in the middle of the project.
Lift the front corner up enough (tire on ground) to open up the tire well area and make it easier to access. Remove your Driver’s side inner fender liner. You can try and work around the boost tube, but it’s easier to just remove it and give your self some room.
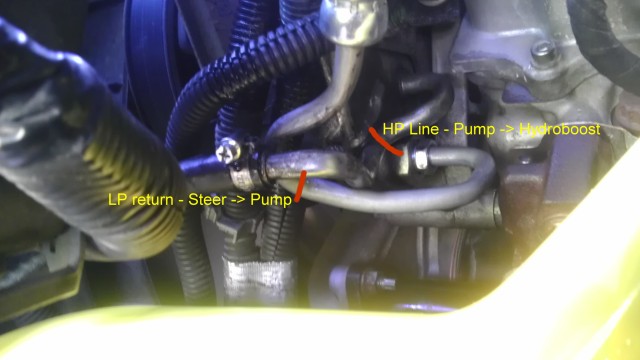
This is the location where the Low Pressure return line, coming from the steering box below, attaches to the PS pump inlet tube.
2.
![Image]()
2.
Looking down from the top, running over the boost tube, here is (with PS fluid spilled on it ) the new 4’ return hose (included in the kit) attached at the PS pump's inlet tube. Both hoses will route in the gap between the lower boost tube coupler and the ECM, thru existing holes in the core support, below the DRL/Turn fixtures.
![Image]()
This is looking down in the space between the battery/washer fluid/core support, the 3' hose from the cooler joining the existing return line from the gear box (see blue lower boost tube boot) that we removed from the pump inlet tube. I'm anal, I used 4 clamps but 2 will work.
![Image]()
The kit came with a self-adhesive isolator pad that was the same width as the bracket up front and I already had some black plastic zip ties to affix thru the existing holes.
![Image]()
Dust it with a light coating of flat-black enamel paint to hide behind grill in darkness.
![Image]()
Start up, move the wheel back and forth a few times to displace the air in the lines, then fill PS reservoir to proper level. Re-install the Grill and both headlights, and we're done.
There are a variety of paths to choose from in adding a Power Steering Fluid Cooler.
One choice (thx Eric!) is to obtain and add the GM part # 10385584 ($130) for the 6.6L.
Or you can choose GM part #15295847 ($80) for the 8.1L and adapt it to fit.
Both mount here, utilizing the condenser coil’s top mounting bolt with an added bolt (#11589039, $1.50) to an existing hole in the trans cooler bracket.
Edit: I see that Dorman offers a kit now that looks similar to the stock GM kit, and how it mounts up front....$48 More Information for DORMAN 918301
In pursuit of lowering the price further, look around fleaBay and Amaz and there are numerous kits available in various sizes that could fit in the same area as the GM shown above.
This one is a bit smaller;
Derale 13200 Power Steering Cooler Kit
Not wanting to play the ship and wait game, pursue available inventory on a local basis.
These are cheap enough that you could bridge two together to equal the GM size for $40.
Hayden Power Steering Oil Cooler
I ended up with THIS cooler from VatoZone.
It was larger than the others and only $30.
It comes with a 4’ section of hose and 4 hose clamps. Add another 3’ piece of hose and 3-4 hose clamps to the mix, along with a double hose barb for the hose splice.
You’ll need 5 clamps total, unless you reuse the lame OEM spring clamp, and you might strip one out over-tightening. Better to have an extra than make a return trip in the middle of the project.
Lift the front corner up enough (tire on ground) to open up the tire well area and make it easier to access. Remove your Driver’s side inner fender liner. You can try and work around the boost tube, but it’s easier to just remove it and give your self some room.
This is the location where the Low Pressure return line, coming from the steering box below, attaches to the PS pump inlet tube.
2.
Looking down from the top, running over the boost tube, here is (with PS fluid spilled on it
) the new 4’ return hose (included in the kit) attached at the PS pump's inlet tube. Both hoses will route in the gap between the lower boost tube coupler and the ECM, thru existing holes in the core support, below the DRL/Turn fixtures.
This is looking down in the space between the battery/washer fluid/core support, the 3' hose from the cooler joining the existing return line from the gear box (see blue lower boost tube boot) that we removed from the pump inlet tube. I'm anal,
I used 4 clamps but 2 will work.
The kit came with a self-adhesive isolator pad that was the same width as the bracket up front and I already had some black plastic zip ties to affix thru the existing holes.

Dust it with a light coating of flat-black enamel paint to hide behind grill in darkness.

Start up, move the wheel back and forth a few times to displace the air in the lines, then fill PS reservoir to proper level. Re-install the Grill and both headlights, and we're done.


