Chevy and GMC Duramax Diesel Forum banner
Status
Not open for further replies.

How To: LLY EGR Delete

1 reading
307K views 224 replies 81 participants last post by  flynn78us  
#1 · (Edited)
First off, I used the EGR Delete Tube and EGR Cap from ProFab, awesome pieces, quality work IMO, and the fit and finish is great.

You will need to get about 2 feet of 5/8 heater hose as well and some misc nuts and bolts(the nuts and bolts are personal preference this is just how i did mine). Also, now would be a good time to reroute your pcv if you havent already so keep those parts in mind.

Remove the Resonator Box and the Turbo Mouthpiece.

pull the black harness back a bit so you can work, be carefull with the harness. I didnt have the mp out yet in the pic.
Image


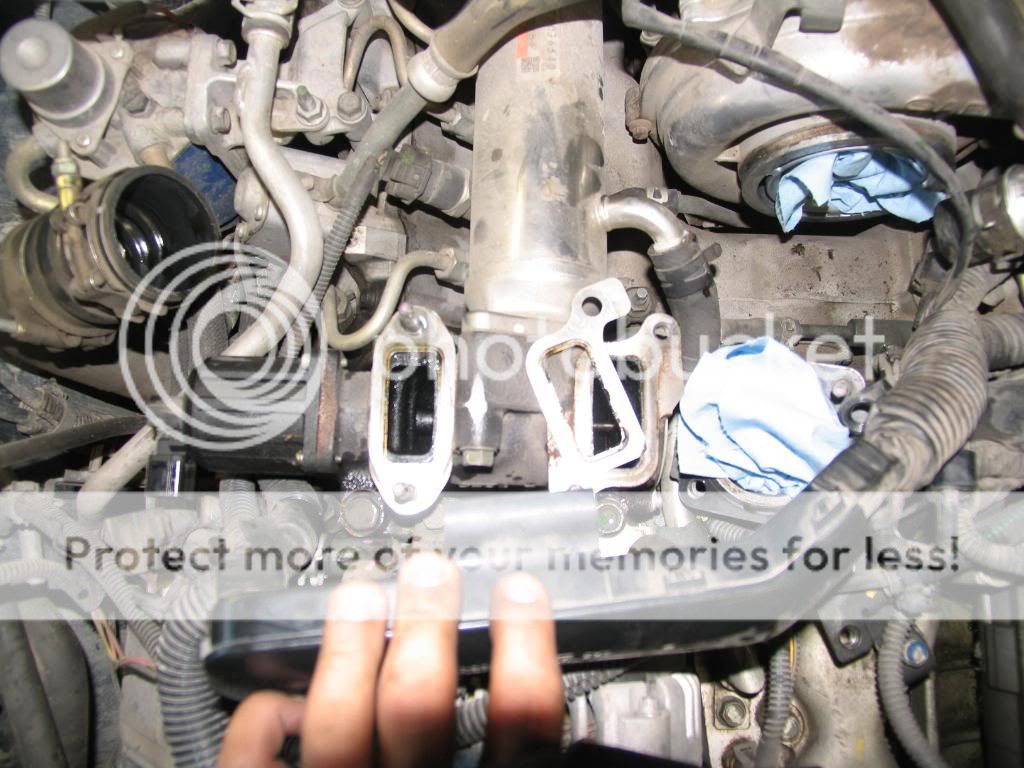
remove these nuts and bolts(the ones with red arrows can be seen in the pic, the ones with blue arrows you cant really see here)
Image


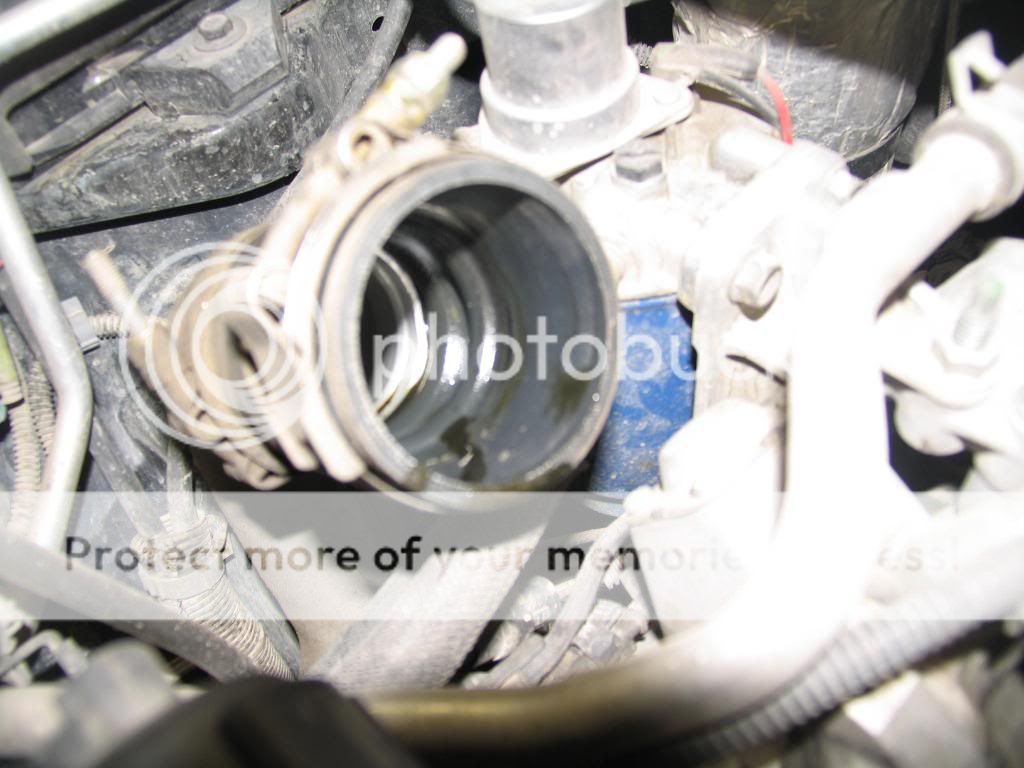
after the bolts are out, pull the harness on top towards the front of the truck and remove, then it should like something like this.
Image


note the filthy rubber boot
Image


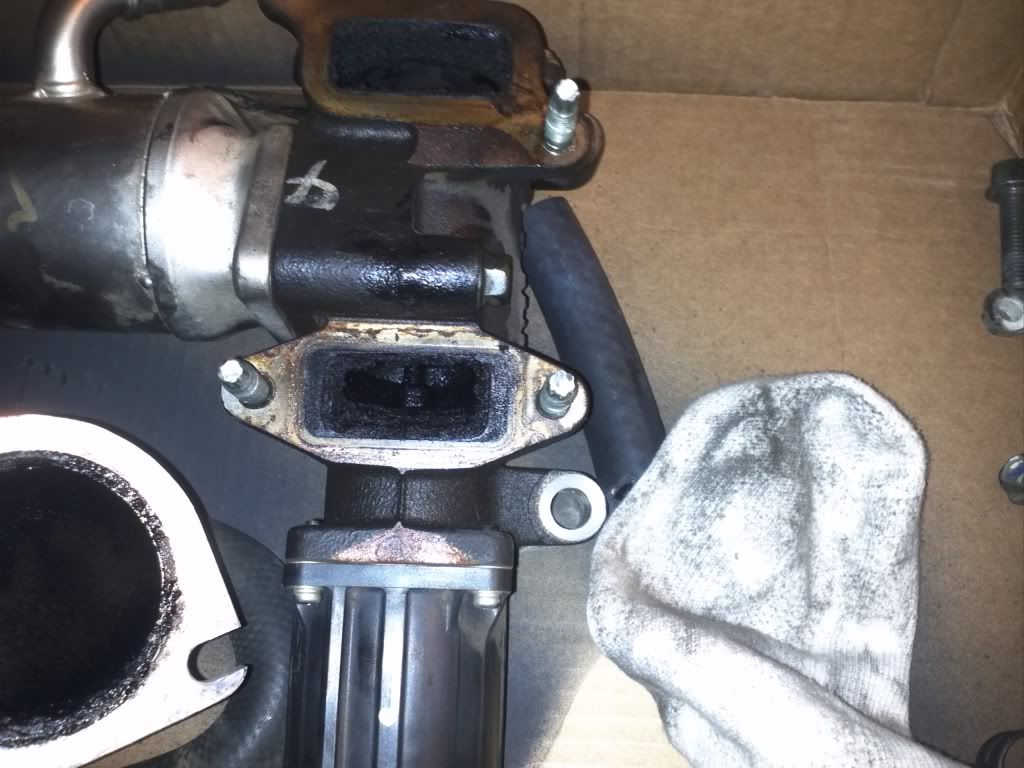
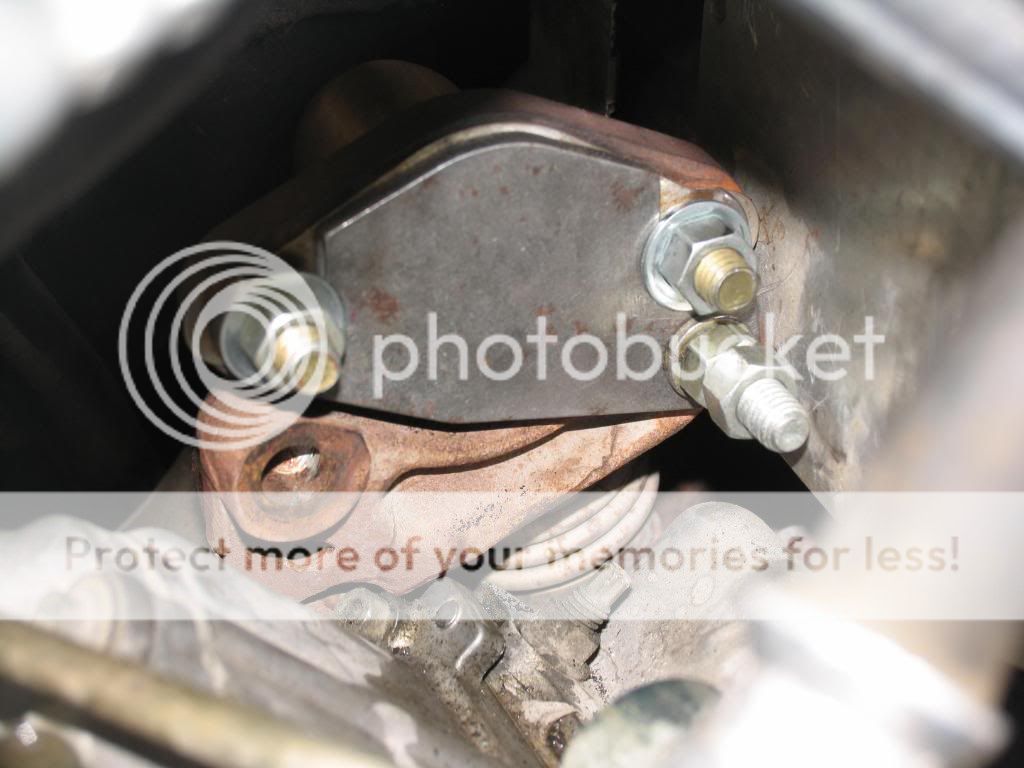
Now remove the four bolts/nuts on the back of the egr cooler, they are kind of a pain in the ass but have patience. The top two are studs with nuts on em, i hade one stud come out with the nut, the other one just the nut came off and i had to get creative to get the stud out so i could remove the cooler.
top arrow is the cooler hose you will be replacing, bottom two arrows show where to look for the bolt/nuts.
Image


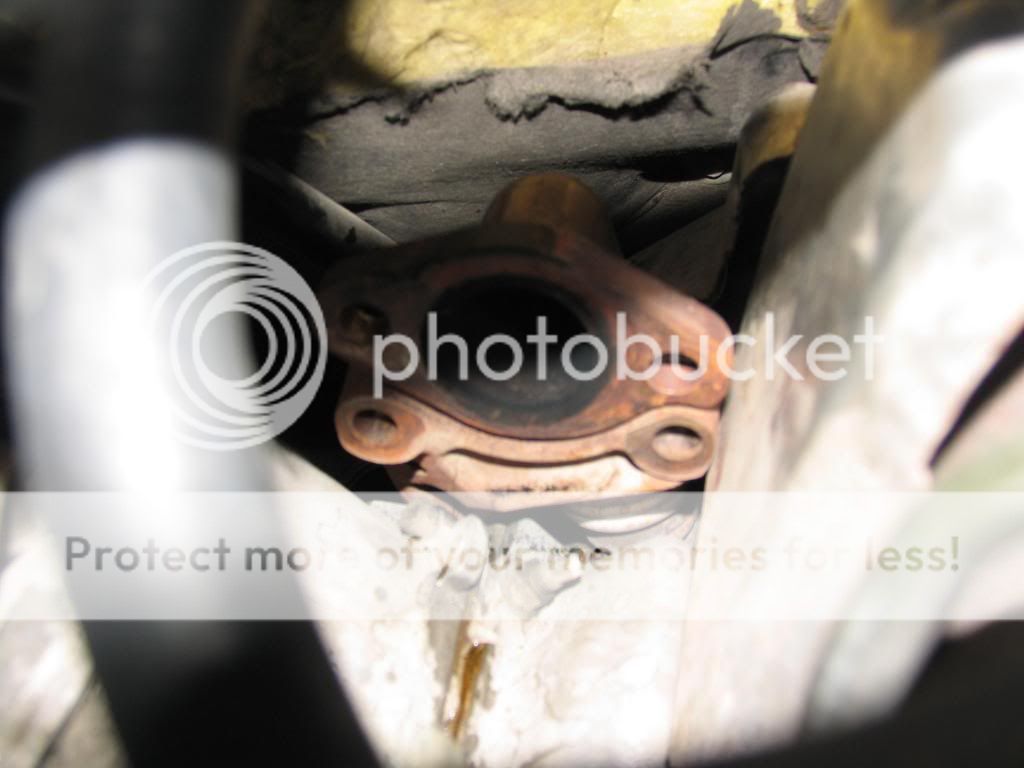
this pic shows where the heater hose will be going, and also what you will see one you wiggle the cooler out.
Image


and this is where the cap is gonna go, you will want to get some bolts and nuts to get the cap locked down, i used some stuff i had layin around since the cap will just be temporary until i get my new up pipes. dont forget the gasket. i used two nuts on the bottom to keep from backing off(kinda ******* but its just temporary)
Image

Image


now slap the delete tube in there with the gasket and cinch er down, i had to cut the bolt on the left down, and the one on the right needs a space for the tab that holds the coolant line.
Image


I ziptied the ficm harness box back down and taped the egr harness out of the way afterwards. Put the mp and resonator box back on, install the intake and your done.

ps, its late, im tired, i will clean this post up tomorrow(spelling, and double check it makes sense).
 
#39 ·
do you get a check engine light? Or is there a remedy for this?
 
Save
#42 ·
What is the difference between this setup and the EGR delete from Sinister that is on Alligator's website?
 
Save
#43 ·
RDL and Allseason delete kits are completely smooth inside.
Sinister kit just blocks off EGR ports on the underside of the stock intake where the EGR is removed.
 
Save
#45 ·
So is there a downside to getting just the block off plate? I'm trying to decide if the all season kit is worth the extra money. Any opinions would be really helpful! Thanks!

If you're heading towards higher HP/torque numbers, then yes it's worth it.
If not, just save your money for other mods and use an EGR block off plate.
 
Save
#47 ·
So if I got this right, deleting the EGR like this means you have less heat transfer to the cooler but what cooler exactly are you talking about?

If your deleting the EGR what is the purpose of putting another pipe back in it's place if there is no more flow?

If you delete the EGR, get a new up pipe, and manifolds will it put more stress on your heads if your running a stock turbo/engine? I ask these questions because I had this convo yesterday with my local shop and unfortunately I am still new to all of this
 
Save
#48 · (Edited)
So if I got this right, deleting the EGR like this means you have less heat transfer to the cooler but what cooler exactly are you talking about?

See photo

If your deleting the EGR what is the purpose of putting another pipe back in it's place if there is no more flow?

LB7 up-pipe has no riser (ie smooth exhaust flow), again see photo.

If you delete the EGR, get a new up pipe, and manifolds will it put more stress on your heads if your running a stock turbo/engine?

The minimum you need is the delete pipe and a cap for the riser, see photo. If you want go the extra mile, you could replace the up-pipe with an LB7 version (no riser) or weld the riser shut to give you better exhaust flow. You wouldn't see much difference without higher HP application. You can also replace the driver's side exhaust manifold with one from an LML motor since it has no indentation for the steering shaft, again only if you are looking to maximize exhaust flow.

I ask these questions because I had this convo yesterday with my local shop and unfortunately I am still new to all of this

This pic should help clear up alot for everyone, the rest of the answers are above.

The EGR delete bypasses the EGR completely (since it gets removed) and connects the boost tube to the "engine intake" thereby eliminating the EGR intake ports ("EGR exhaust gas exit") as shown in the photo. Coolant lines are replaced with a piece of heater hose that connects the missing section together. A cap plate gets bolted to the up-pipe riser ("exhaust gas from up-pipe riser") to close off the flow of exhaust. That's pretty much it in a nutshell.
 

Attachments

Save
#49 ·
Thanks bro!
 
Save
#50 · (Edited)
Well I got mine on tonight and it was brutally cold, but I'm having a few fitment issues.

The flange where it bolts to the intake horn seems to be clocked slightly off and it wants to push the horn out of the intake bridge. The front foot on the tube was also a bit too large and I had to grind a bit of the edge in order to get the bolt to start. Not alot, but it's not nearly like the stock part it was replacing. I'll try and get a photo of both of these issues tomorrow and post it up (until then, I've used the other one to show where my issues were).
 

Attachments

Save
#51 · (Edited)
Well I finally got everything resolved for fitment issues, but the directions for this definitely need to be alot more specific. First for those of you doing this in the future, I had to grind the foot on the front edge of the support in order to allow me enough movement to get the clocking correct on the intake gasket/elbow. I couldn't even get the bolt started so unless the design was modified, this is a must to make it all fit properly IMHO. Also if you take off your intercooler boots, be sure to note that they are labeled as to which side goes toward the engine and which attaches to the boost tube. I also suggest removing the plastic wire harness protector that attached to the stock intake and wrap all the wires with several layers of electrical tape before covering with the correct size cable conduit shielding. Makes the engine bay alot neater and it's easier to work on the engine without the giant plastic shield on the wire harness.

Next, make sure that the EGR delete support feet sit flat on the mounts where the EGR cooler was originally attached. The spacers are to be used on top of the feet. Now, there were some spacers provided with my Profab kit, but there was no indication of what went where and how they were supposed to be used. So in order to be consistent, I just went to Home Depot and picked up around (16) 10mm washers in order to customize the spacers as I needed. In order to mimic the height of the EGR you need use enough washers for the bolt head to be at the same height as stock. On the rear foot, you'll need around 1/2" total of washers (distance between the foot and the bracket for the coolant tube) and on the front foot you'll need around 3/4" of washers if you don't want to cut the bolt down since it will bottom out in the hole otherwise (I don't suggest cutting it in case you wish to reinstall the EGR cooler at some point). Since washer thicknesses can vary, use your old EGR cooler to check that you have the correct height for your wahser stack (make sure to account for the support feet which will take away around 2 washers worth of thickness). If you're having some trouble getting all the washers under the coolant tube bracket, pry it up slightly so they all fit, then snug it back into place when you tighten the bolt. If you're having trouble keeping the washer stack in place while starting the bolt, a tiny drop of superglue bewteen each will keep them together until they are torqued down.

Finally, the EGR riser cap that was provided needed a bit of work to be flat and bur free. For this step I'd suggest before using it that you get some 400-600 grit wet/dry sandpaper, spray the sandpaper with WD40, place it on a very flat surface (such as a piece of glass or other known flat surface) and then sand the mating surface using a circular pattern. Once you've done this properly, you should see that there are no places where the gasket comes into contact that haven't been touched while sanding. Also make sure the riser and gasket surfaces are as clean as posssible to ensure a good seal (wire brush and carb cleaner helps get rid of any carbon/rust deposits). With my 3-hole riser cap, I used (2) M10 x 1.50 x 35mm bolts, (1) M10 x 1.50 x 45mm bolt, (6) 10mm washers, (3) 10mm lockwashers and (3) 10mm nuts to attach the cap in place. I had the 3-hole version of the cap so if you have the 4-hole version, you'll need to add another M10 x 1.50 x 45mm bolt, (2) washers, (1) lockwasher and (1) nut. The 10mm bolts are too large to fit through the metal riser gasket so you'll need to enlarge the holes to make it work (better to grind the hole larger than to drill since the gasket bends easily). Use a washer on each side of every bolt/nut and lockwashers go on last just before the nut. The shorter bolts hold the cap to the riser and the longer bolts are used to attach the cap to the block to keep it from moving. Once you have it all in place, then go ahead and snug everything down nice and tight and you shouldn't have any leaks. If you do still develop a leak, replace the riser gasket with a new one.

Hopefully this helps others to install their EGR delete kit a little easier.
 
Save
#54 ·
Well I finally got everything resolved for fitment issues, but the directions for this definitely need to be alot more specific. First for those of you doing this in the future, I had to grind the foot on the front edge of the support in order to allow me enough movement to get the clocking correct on the intake gasket/elbow. I couldn't even get the bolt started so unless the design was modified, this is a must to make it fit properly IMHO. Also if you take off your intercooler boots, be sure to note that they are labeled as to which side goes toward the engine and which attaches to the boost tube. I also suggest removing the plastic wire harness protector that attached to the stock intake and wrap all the wires with several layers of electrical tape before covering with the correct size cable conduit shielding. Makes the engine bay alot neater and it's easier to work on the engine without the giant plastic shield on the wire harness.

Next, make sure that the EGR delete support feet sit flat on the mounts where the EGR cooler was originally attached. The spacers are to be used on top of the feet. Now, there were some spacers provided with my Profab kit, but there was no indication of what went where and how they were supposed to be used. So in order to be consistent, I just went to Home Depot and picked up around (16) 10mm washers in order to customize the spacers as I needed. In order to mimic the height of the EGR you need use enough washers for the bolt head to be at the same height as stock. On the rear foot, you'll need around 1/2" total of washers (distance between the foot and the bracket for the coolant tube) and on the front foot you'll need around 3/4" of washers if you don't want to cut the bolt down since it will bottom out in the hole otherwise (I don't suggest cutting it in case you wish to reinstall the EGR cooler at some point).

Finally, the EGR riser cap that was provided needed a bit of work to be flat and bur free. For this step I'd suggest before using it that you get some 400-600 grit wet/dry sandpaper, spray the sandpaper with WD40, place it on a very flat surface (such as a piece of glass or other known flat surface) and then sand the mating surface using a circular pattern. Once you've done this properly, you should see that there are no places where the gaskets comes into contact that haven't been touched. Also make sure the riser and gasket surfaces are as clean as posssible to ensure a good seal. Again I used (3) M10 x 1.50 x 35mm bolts, (6) 10mm washers, (3) 10mm lockwashers and (3) 10mm nuts to attach the cap in place. I had the 3-hole version of the cap so if you have the 4-hole version, you'll need to add hardware accordingly. The 10mm bolts are too large to fit through the metal riser gasket so you'll need to enlarge the holes to make it work (better to grind the hole larger than to drill since the gasket bends easily). Use a washer on each side of every bolt/nut and lockwashers go on last just before the nut. Then go ahead and snug everything down nice and tight and you shouldnt have any leaks. If you do still develop a leak, replace the riser gasket with a new one.

Hopefully this helps others to install their EGR delete kit a little easier.
Sorry for the trouble. I'll be more and happy to send you a replacement.

To anyone that buys our product;
We need to be contacted about issues with our products. We can't make them better if we don't know about these things!!
 
#52 ·
This may be a real dumb question but I have my egr delete tube and up pipe ready to install but where exactly does the up pipe connect? I have tried looking for a detailed picture but havent found anything
 
Save
#53 · (Edited)
The up pipe mounts from the back of the exhaust manifold and goes to the turbo (LB7 version w/o riser shown below).

Image
 
Save
#58 ·
Sounds good Rick, I'll send you an email.

I made a few more changes/additions to my directions in post #53 which should help people on the install.
 
Save
#57 ·
Great info...thanks
 
Save
#59 ·
MTL Dmax, I am really trying to learn but am having a hard time understanding all of this. Your pic of the driver side up-pipe I get but isnt it the passenger side that gets replaced by the LB7 version in order to prevent capping it off after you delete the egr?
 
Save
#61 · (Edited)
Yes, you are correct. The passenger side up pipe is the one with the riser and thus gets replaced when switching to an LB7 version which has no riser (provided you don't want to cap your stock pipe). I edited the picture in my post above to avoid any further confusion.
 
Save
#62 ·
I had to do more searching to find a pic with a riser to understand why I didnt receive a cap in my delete kit but it makes more sense after I saw the pic. Whats the easiest way to get to the up pipe in order to swap it out?

I apologize for being a little slow. Im more of a visual learner.
 
Save
#63 · (Edited)
I had to do more searching to find a pic with a riser to understand why I didnt receive a cap in my delete kit but it makes more sense after I saw the pic. Whats the easiest way to get to the up pipe in order to swap it out?

I apologize for being a little slow. Im more of a visual learner.

The bolts on the back of the manifold can be accessed by removing the fenderwell. The ones on the back of the turbo are just a major PITA in general but a flex head ratchet will make the job alot easier. They are 12 point bolts so have the correct socket on hand as well. Whatever you do, don't break off the bolts at the turbo or it will need to come out (or lift the cab) in order to drill out the broken bolts (ie major job either way). I would also definitely soak all the bolts with Kroil or PB Blaster the night before to make them easier to remove. I'd also suggest using new gaskets on both ends of the up pipe so you can be sure you don't have any leaks after install.
 
Save
#64 ·
I have been told by many people to do this but I have yet to be told what it does! So do you get more HP/torque, better fuel mileage, sound difference.... What is the purpose?? Sorry if its an obvious answer I just don't know :cookoo[1]:
 
Save
#65 ·
It will prevent soot/sludge build up in the motor, improve air flow from the intercooler tube into the motor and prevent some of the heat transfer. I just did mine on New Years eve, I couldn't believe how much sludge was in there!!! I had already rerouted the PCV about two months ago but sheesh it was nasty. Below are some pics of mine.

Image


Image


Image
 
Save
#66 ·
Oh ok alright! Wow that's impressive!!! Thank you so much!! I can't wait to do mine! I dont even wanna know what mine looks like :eek: so can you notice a difference then in how your truck runs??
 
Save
#69 · (Edited)
Oh ok alright! Wow that's impressive!!! Thank you so much!! I can't wait to do mine! I dont even wanna know what mine looks like :eek: so can you notice a difference then in how your truck runs??

Yes, I definitely did notice a difference.......really wakes the truck up when you start spooling the turbo and has added 1 MPG so far (it's winter too).
I do have EFI, a full LBZ intake and a 4" turbo back exhaust though, so not sure how it would feel on a bone stock truck.
 
Save
#67 ·
Seems to be more responsive on the throttle. Haven't driven it that much since I did the delete honestly, I was doing multiple things to it at the same time so I just got her put back together to go to work.
 
Save
#71 ·
I have read this whole thread and noticed that one guy asked if the ppe will delete the engine code. Will a constant engine code be thrown if i don't the egr delete and if so will a normal scanner remove it permanently. If not what will i need to remove the code. I really wanna delete the egr but don't want to look at a check engine light all the time.
 
Save
#72 ·
I believe EFI can stop the code from showing up....not sure of the canned tuners, I believe the fingerstick will stop the codes as well, Not needed luckily on my truck (FE9)
 
Save
#74 ·
I'm seeing mixed thoughts in different threads.....So when I do the EGR delele, it'll for sure throw a code, but this can be fixed with just the fingerstick? Or must I absolutely have some sort of tuner to turn off the code? I'm not interested in purchasing any tuner at the moment, so if a fingerstick is all I need that would be great.
 
Save
#75 · (Edited)
I'm seeing mixed thoughts in different threads.....So when I do the EGR delele, it'll for sure throw a code, but this can be fixed with just the fingerstick? Or must I absolutely have some sort of tuner to turn off the code? I'm not interested in purchasing any tuner at the moment, so if a fingerstick is all I need that would be great.

Short answer is there are several ways to prevent EGR related codes, but the fingerstick only works when you use the EGR blocker plate. If you're going to a full delete where you're unplugging and removing the EGR completely, then you need something else to handle the related DTCs. There are several canned tuners which do this for you (need to check with the manufacturer to see if that is an option on whatever model you're looking at). Obviously EFI will do it all and is what I would recommend for a full EGR delete.

Info on Finger Stick
A Finger Stick is a simple circuit that modifies the MAF signal on LLY and LBZ engines (not LB7 engines) to expected levels when the EGR is blocked or a free flowing exhaust system causes the ECM to set codes. This will prevent a Service Engine Soon light from illuminating and will prevent the ECM from displaying DTC codes related to the EGR modification.
 
Save
#76 ·
Purdy cool. But what is the purpose of this. HP. Precaution or what. Kinda late to post but I just got here
 
Save
#77 ·
Stupid question guys.... Can someone explain where the 5/8 heater hose will connect too after you delete the egr system?


Sent from my Autoguide iPhone app
 
Save
#79 ·
Stupid question guys.... Can someone explain where the 5/8 heater hose will connect too after you delete the egr system?


Sent from my Autoguide iPhone app


In stock form, the coolant exits the coolant tube next to the thermostat, then travels through the EGR cooler and finally passes into the heater core (which supplies heat to your cabin). Once you remove the EGR cooler, you still need to connect the coolant tube and the heater core or you'll have a hard time defogging/defrosting the windshield not to mention having some heat in the winter.
 
Save
#78 ·
^^^Hopefully I can explain this correct but...

On the right side of the egr cooler tube is a small piece that connects to a hose. Follow this hose down until you see where it connects to on the other end. After you pull out the egr cooler, the heater hose will connect from just above the firewall to where the egr cooler hose went.

Sorry for not knowing specific names. I just did this last night on my truck and was just trying to connect things back together so I didnt pay too much attention on specifics
 
Save
Status
Not open for further replies.
You have insufficient privileges to reply here.