Chevy and GMC Duramax Diesel Forum banner

Doing head gaskets in cab

16K views 58 replies 12 participants last post by  TexasDmax361  
#1 ·
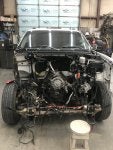
What’s up everyone. I know there are tons of posts here about people doing their head gaskets but I figured I’d start my own. Obviously I have the lml Duramax and it’s already been fully deleted with the exergy sportsman cp3 conversion. I will be tackling this job on my own at home with the merchant head gasket kit and xotic performance head studs. I had a question about installing the head studs since I’m doing the job in cab and highly doubt I would have the room to install the studs then set the heads on. Would it be ok to set my heads down then start installing the studs and do I use the assembly lube on all threads top and bottom ? May be a dumb question but I am absolutely new to diesels. Iv built many engines n actually building a k20a type R engine for track racing but diesels are a different breed but I’m excited to learn and hoping to get all the help and advice I can get from this forum.
 
#2 ·
Good luck and keep us posted. I did this last summer and it's a heck of a job.
A couple pieces of advice: 1. Take your time and if you get frustrated walk away. 2. Get an over top creeper; I used a 2x8 bridged between the windshield frame and radiator housing, looking back an over the top would have made things so much better. 3. Keep everything organized as you take parts off and mark all electrical and fuel connections (even if it looks simple to put back together).

As to your question... I'm not familiar with your specific products, I used malahe c gasket with arp studs. I followed the directions in the package, which I believe had you put all studs in (except the bottom driverside closet to firewall) then set heads over them. Top and bottom get the lube. This is from memory that I have tried to forget.

Hope all goes well.
 
#4 ·
Good luck and keep us posted. I did this last summer and it's a heck of a job.
A couple pieces of advice: 1. Take your time and if you get frustrated walk away. 2. Get an over top creeper; I used a 2x8 bridged between the windshield frame and radiator housing, looking back an over the top would have made things so much better. 3. Keep everything organized as you take parts off and mark all electrical and fuel connections (even if it looks simple to put back together).

As to your question... I'm not familiar with your specific products, I used malahe c gasket with arp studs. I followed the directions in the package, which I believe had you put all studs in (except the bottom driverside closet to firewall) then set heads over them. Top and bottom get the lube. This is from memory that I have tried to forget.

Hope all goes well.
Question...Why all but the bottom driverside closest to firewall?
 
#6 ·
Oh ok makes since.
 
#7 ·
Damn removing the fenders looks like the way to go for sure I wish I had the access to a recovery tool but unfortunately I do not. Ok so I can technically install all studs before dropping the heads down other than that one. Thanks bud! Also did y’all set the valve lash to .010 or .012 i been hearing both n not sure which one to go with
 
#56 ·
I don't have a recovery tool either, I just taped up all of the AC hoses and ports while I worked on the truck and 3 months later when it was back together I shot two cans of 134 in and it works great. Be sure not to drain oil from the compressor.
Put the problem studs in the back into the head, suspended by a zip tie on each one, but leave the others out until the head is positioned on the dowel pins. Then drop the other bolts in place. Much easier.
I set my valve lash at .011 because i couldn't decide. Seems quieter now and runs awsome.
I pulled the engine because I wanted to change my down pipe and clean/paint everything.
Image
 
#8 ·
I’ll def be bagging n labeling every bolt n piece that comes off along with taping each side of a connector n numbering them to Match. Just something I learned when first getting started building imports n not always knowing the name of each component I would just use numbers to match shit up for the harness 😂
 
#14 ·
Keep the injectors in order.. They are programmed per cylinder.. You need to replace the injector seals also.. Many other seals and gaskets needed.. I hope you are ready for this adventure!
Image
 
#15 ·
I got the merchant auto kit as seen in the pic I posted so I have every single seal, gasket n o ring I could possibly need and even ones I don’t need 😂 tbh I’m not really ready but I don’t have much of a choice. I’m ready to have that piece of mind instead of the constant worry while hauling on a daily basis. I’ll have a cpl friends over to help here n there but it’ll be mainly me doing this job for the most part. The only part I’m skeptical about is the valve lash. Iv watched so many damn videos tho that I think I got it down.
 
#19 ·
I've done more than I can remember.. Tried every way possible.. Lifting cab has been the easiest way for me and my body.. I remove the turbo and then the high pressure lines and low pressure lines without separating the lines..
Getting the lines out, back in place and in order takes more time with the turbo on, for me..
Keep us posted on the progress..
 
#24 ·
My 17 year old son and I did the head gasket on his daily driven straight I6 ‘99 Jeep XJ. Did a few other things while we had it apart but what a pain in the ass. We didn’t have any left over parts and it runs good but I told him that may be our one and only lol.

Good luck TexasDmax, yours will be a lot more work than what I dealt with.


Sent from my iPhone using Tapatalk
 
#25 ·
Thanks bud it’ll be a lot more work then I’m use to thats for sure. Hondas are a walk in the park compared to what Iv been seeing with this duramax 😂 but I just paid 9k last year on the cp3 conversion when my cp4 blew up so it’s time to bust some knucks n learn this lml cuz I’ll never pay that kinda labor cost again!
 
#26 ·
So I posted my merchant auto kit on my snap n a buddy of mine called to say I don’t have time to help but what I can do is get you the full print out from all data. Sure is good to have great friends sucks he’s unable to help physically but the print out he’s getting me is prolly the best help anyone I know could have offered
 
#28 ·
Tbh I haven’t started yet I plan on starting here in about 2 weeks. It’s very hard for me to shut my truck down for any amount of time. In a couple weeks I’ll have a buddy letting me use his flat bed while my trucks down. I don’t plan on rushing it. I’ll be using whatever down time I have to get it done
 
#29 ·
Gotta admire a guy that tears into a job like this for the first time. So you have a lift? Or are you just planning on removing the necessary front end parts? I know the guys that have a lift have made an art of lifting the cab and front clip and they're really quick at it. But I didn't have a lift so just took off the necessary parts. It's really not a big deal to remove the hood, grille, cooling stack, radiator support and right side fender but I was pulling the engine to install a piston. If I were doing head gaskets, I'd probably just go ahead and remove all that stuff anyway, tired of laying on my ribs anymore. You can walk right up to everything and have good access. I'm sure you'll figure out what works best for you.